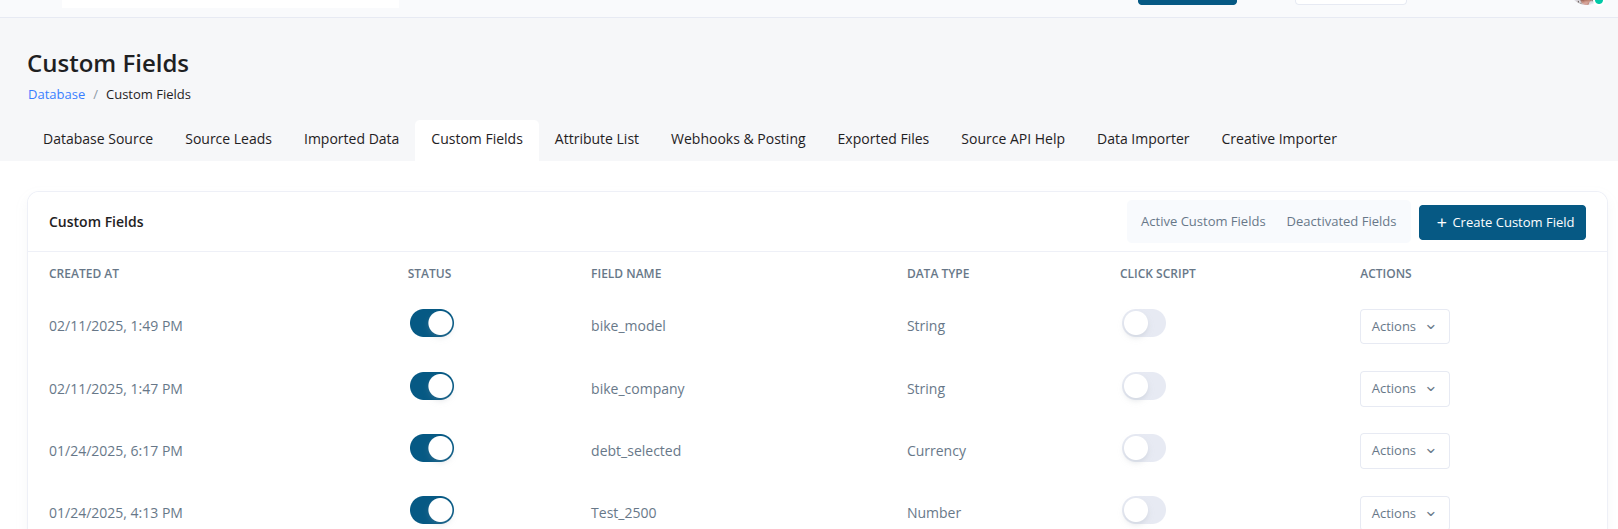
Custom Endpoints
The term “endpoint” at its highest level, is a URL generated by an external server which can be used to facilitate data transfer, updates, or execute similar actions from web browsers and other applications referred to as “clients”. In Pingtree’s case, the “custom endpoint” casts a wide net when it comes to use-case, functionality and capabilities. Below are a few common examples for how custom endpoints are used in Pingtree.- Lead Buyers: Sending lead data to buyers will generally be facilitated through a custom endpoint (Advertiser would be the alternative which would provide the buyer with their own advertiser portal)
- CRMs: Sending lead data to your own CRM or the CRM of a third party is a common use-case.
- Databases/Data Lakes: Another potential use-case would be any sort of data warehouse or visualization tool where lead data may be stored.
- Dialers: Similar to CRMs, dialers can also be a common practice for Pingtree users to facilitate lead data transfers.
- Field Mapping
- Transformer Tool
- API Request Formats & Languages
- Posting Formats
- Endpoint CAPs, Filters & Plugins
- Dynamic Response Mapping
- Testing Endpoint Feature
- Minimum Pricing
- Click Listing Build
- Click Listing Filters & Routing
- What function do these endpoints serve? Are they direct buyers, your CRM, a dialing system, a database etc..
- Which routing methodology will this campaign be based on? Form or Click Routing, Ping+Post Routing, Pingtree Routing.
- Which filters and rules are you going to want to assign for your endpoint?
- Have you received the API specs for the server in which you will be sending the data to?
Endpoint Configuration and Distribution Setup
Step 1Endpoint Creation: Create the endpoint by selecting “Add Custom Endpoint” in your Distribution —> Custom Endpoint view. Apply a name and a parent endpoint which can be one and the same. Step 2
Lead Routing: Inside of your lead routing section is where you will manage the bulk of your build. Add your endpoint URL, a backup URL (if applicable), **minimum price (if applicable) and map your parameters. This includes headers and/or static fields. **Minimum Price feature applies if the endpoint’s server is including a price value in their API response AND you want to only sell the lead to the endpoint if that price that’s returned is greater than or equal to the value you set. Step 3
Determine your HTTP method (Pingtree supports both GET and POST). This should be in the API specs for the server you’re sending this data to. Step 4
Determine your POST format. If sending your data via a POST method, you will need to confirm the format. By default, Pingtree is formatted to send POST as JSON. (Pingtree also supports sending POST requests as x-www-form-urlencoded, form-data, XML-16 and XML-8). This information should be in the API specs for the server you’re sending this data to. Step 5
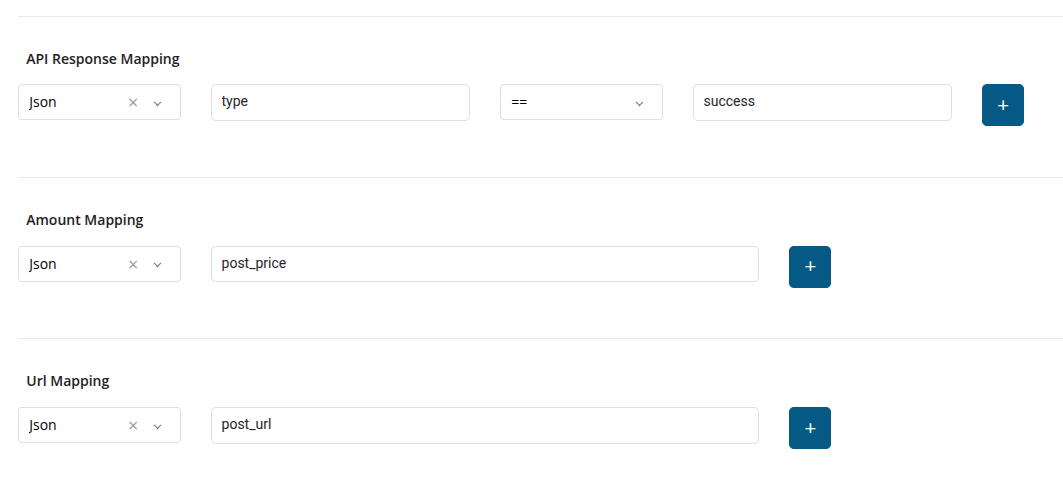
Add Response Mapping: When you send a lead to an endpoint in this way, you are calling an API. This API transmits your data from Pingtree’s server to the endpoint’s server. That initial delivery of data is called the API request. As a result the server that’s ingesting this data will send back an API response. Response Mapping allows you to create logic surrounding this API response and the data the endpoint’s server just received. With this API response, you can configure rules or dynamically capture data for reporting purposes as well as other features. Each of these response mapping fields allow you to capture this data in either JSON or XML which is determined by the endpoint’s server and how they send their responses. API Response Mapping: In this field, you will be mapping the endpoints response so that you can determine if a lead was actually accepted by the endpoint’s server. You are mapping this from their API response so this would typically be included in their API specs. *Below is a common mapping you may see.
Sample Response Feature: Pingtree gives you the ability to preview the API response of an endpoint’s server without needing to look at their docs. Simply add an existing Pingtree transaction_id into this field, and click “Get Sample Response” to call their API and generate a response. Depending on their server or API setup, they may not provide all or any data in the response but utilizing this feature can be helpful. Step 6
The third tab inside your Lead Setup and Routing section is “Filters”. In this section, you will determine the GENERAL rule logic for this endpoint. Black List Alliance: You can enable this feature by toggling it on, and it will prevent any leads that were either rejected or unprocessed by Black List Alliance from being delivered to this endpoint. **In order to successfully use this feature, you will need to add in your Black List Alliance account code and token in your campaign settings
Geolocation Filters: Determine which states or zip codes should be excluded from being sent to this endpoint.
CAP: You may set CAP limits for this endpoint. Choose to set your CAP method as a global CAP, monthly CAP, weekly CAP or daily CAP. Additionally for daily CAPs you may also assign a daily payout CAP.
Time Filters: Also called day-parting, this filter will allow you to enter the days of the week as well as the time periods where you can attempt to sell leads to an endpoint. Simply add the start and end times in the appropriate days and activate the “Enable Time Settings” toggle. Step 7
Price Settings: You can assign a fixed price which will be attributed to an endpoint anytime a lead is sold to them. You can bifurcate this by source type: (Media Channel, Marketing Partner or Custom Source).
If you choose to configure with this option, be sure to enable the “Override Campaign Settings” toggle Step 8
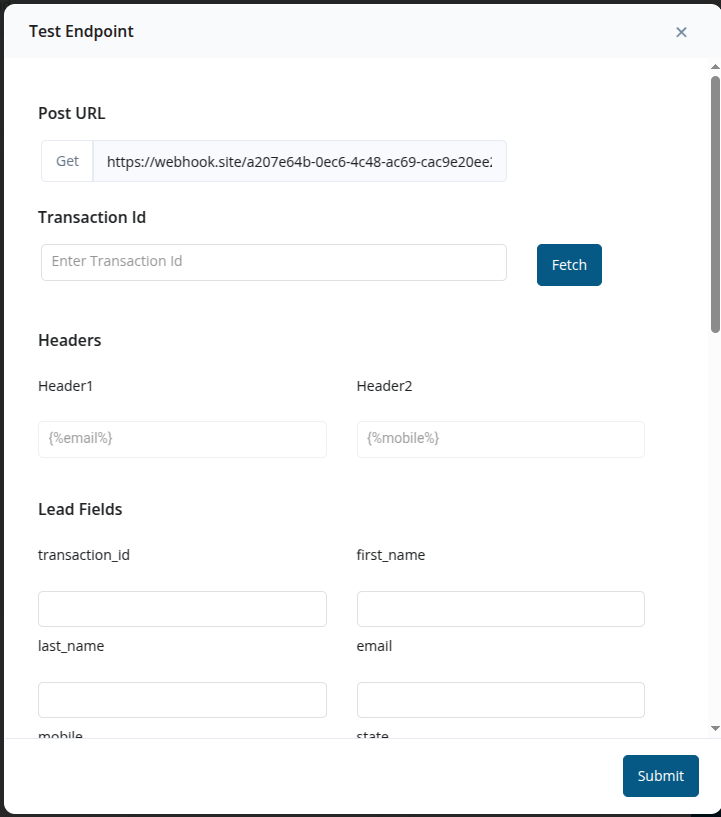
Testing: Once these steps have been completed, you have the option to test the server to server connection and ensure your field parameters are mapped to the endpoint’s parameters correctly. Select the “Test Endpoint” button which will prompt a dialog box which includes any fields you have mapped and static fields added. Begin adding the actual values these fields would contain (Not the fields themselves) as you are simulating an actual lead posting to this endpoint. Once finished, click “Submit” and this should generate an API response from the endpoint’s server. This is a great tool in ensuring your server to server connection is functioning as expected.
Enable and activate your endpoint. Do this by toggling on the “Enable Endpoint” toggle and in the upper lefthand corner of your lead mapping view, select the drop down to “activate” if it’s not selected already. Step 10
Routing Rules: Pingtree gives you the ability to create custom routing rules for your endpoints in order to bifurcate the lead data and distribute them to different places. Each rule is based on rule conditions structured as IF/THEN statements. They use lead and attribution data captured in the lead’s payload. If any rules are applied, you will create them here, and in the “Action” field, you will select the endpoint that you wish to attribute this rule to. Only endpoints that are enabled and do not have a separate rule attributed to it will be available from the picklist. You can apply more than one routing rule condition per endpoint but only one rule can be attached to an endpoint at a given time. Step 11
Routing Logic: Applying the routing logic puts your lead distribution into motion. Without adding your endpoint into the lead distribution section, you will not be able to get any data from your source, whether that be a Pingtree Offer or somewhere else, to your endpoint.
In form routing there are 3 basic models: Base Routing: An endpoint can be added to this routing model if there IS NO custom routing rule logic applied. (This excludes general rule logic such as filters, CAP, response mapping etc..)
Conditional Routing: An endpoint can be added to this routing model if there IS any custom routing rule logic applied which was described in Step 10.
Failover Routing: An endpoint can be added to this routing model if there is NO custom routing rule logic applied, AND you want to attempt to deliver leads to this endpoint only in the event that it was unable to be sold to another endpoint in either Base Routing or Conditional Routing. Step 12
Applying Routing Thresholds: Routing Thresholds give users the ability to apply weights and threshold parameters with the primary goal of evenly distributing leads to different endpoints who may have different CAP limits throughout the day.
———————————————————
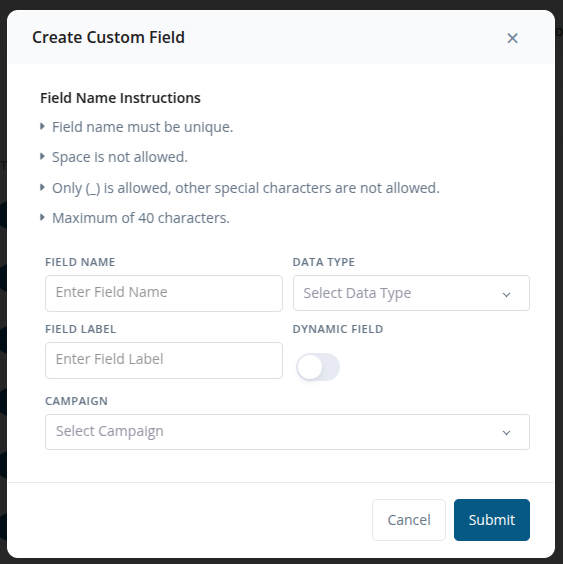
Field Mapping
Fields, also commonly referred to as “parameters” or “keys”, are what’s used to define the structure in which certain values are ingested into a system/application. These fields represent an overlying data attribute such as First Name, Last Name, Email Address and Phone Number. Each of these attributes would contain a corresponding value. Field mapping in this context of sending lead data via API involves the process of mapping data fields from the Pingtree system to another to ensure that the information is properly understood and processed by the receiving system. Once the fields are identified, you will define a mapping between the fields in your lead routing section and the corresponding fields in the target system. This mapping specifies which data from the source system (Pingtree) should be sent to which fields in the target system (Custom Endpoint) and in what structure. Example:You are ingesting the following sets of data in your campaign offer that you wish to send to a buyer (i.e. custom endpoint). First Name, Last Name, Email Address, Phone Number, IP Address, Utm Source
You know that your field attributes for these pieces of data are structured as so: first_name=Michael
last_name=Jordan
email=michaeljordan23@gmail.com
mobile=800-855-8555
utm_source=tiktok
You have received the API specs from your buyer which included their own field structure for each of these data points. They are as follows:
firstName={{Value}}
lastName={{Value}}
emailAddress={{Value}}
phone={{Value}}
sub\_1={{Value}}
If you take “Michael” which is clearly the first name value in this set of lead data. You will need to transfer that same value, into the recipient’s first name. While you aren’t touching the value itself in this example, you will provide the rules on how and where to deliver that value by mapping “first_name” with “firstName”.
With this information, you now know how you will map these fields from Pingtree’s system to your buyer’s system.
System Fields vs Custom Fields
Pingtree System FieldsPingtree has two types of parameters that can be used. System Fields and Custom Fields. System fields are those that are innate to the Pingtree platform. Some of these system fields are general and some are vertical specific. While it’s not required that some of these system fields be used for your offers, it’s highly recommended as there are a number of these fields which are molded to fit other certain components of the platform. Pingtree’s General System Field Parameters Pingtree has a number of system fields that are native to your offers and the application. These fields, by default, are available in your campaigns
| Field Label | Pingtree Parameter |
|---|---|
| Pingtree Unique Lead ID Parameters | |
| Transaction ID | transaction_id |
| Lead Data Parameters | |
| First Name | first_name |
| Last Name | last_name |
| Phone | mobile |
| State | state |
| Zip Code | zip_code |
| Country | country |
| Address | address |
| Date of Birth* | date_of_birth |
| SSN | ssn |
| 3rd Party API Parameters | |
| Debt Amount | debt_amount |
| Trusted Form Ping URL | trustedFormPingURL |
| Trusted Form Cert URL | trustedFormCertURL |
| Trusted Form Token | trustedFormToken |
| Jornaya | jornaya |
| Attribution Tracking Parameters | |
| External Click ID | external_clickid |
| Sub 1 | sub1 |
| Sub 2 | sub2 |
| Sub 3 | sub3 |
| Sub 4 | sub4 |
| Sub 5 | sub5 |
| ADV 1 | adv1 |
| ADV 2 | adv2 |
| ADV 3 | adv3 |
| ADV 4 | adv4 |
| ADV 5 | adv5 |
| Campaign ID | campaign_id |
| Source ID | source_id |
| UTM Campaign | utm_campaign |
| UTM Source | utm_source |
| UTM Creative | utm_creative |
| UTM Medium | utm_medium |
| UTM Term | utm_term |
| UTM Content | utm_content |
| UTM Placement | utm_placement |
| Google Click ID | gclid |
| TikTok Click ID | ttclid |
| Facebook Click ID | fbclid |
| Financials & Performance Metric Parameters | |
| Revenue | amount |
| Payout | payout |
| Cost | cost |
| Ad Spend | adSpend |
| Event Parameters | |
| Event ID | event_id |
| Creative Library Parameters | |
| Marketing Ad ID* | maid |
| Marketing Campaign ID | mcid |
| Ad Manager ID | amid |
| Marketing Ad Group ID | mgid |
| Marketing Channel ID | mid |
| Creative Ad ID | crid |
| Additional Common Parameters | |
| Product | product |
| Product Type | product_type |
| Referral Code | referral_code |
| Gender | gender |
| Age | age |
| User Selected Debt | debt_selected |

- String - This is the most versatile data type and is a sequence of characters used to represent text. Strings can include letters, numbers, symbols, and spaces.
- Boolean - This data type is binary meaning there can only be 2 potential values. This could be represented as
{"True" "False"}, {"1" "2"}, {"yes" "no"} - Integer - This data type represents a whole (non-fractional) number. ex:
{"25"} - Number - A number data type includes integer values as well as fractional numbers. ex:
{"25"} or {"25.353"} - Date - This data type refers to any specific date formatted values. **It is also acceptable to use a string data type if you are collecting a value that’s also formatted as a date.
Data Transformer
Data Transformer Overview
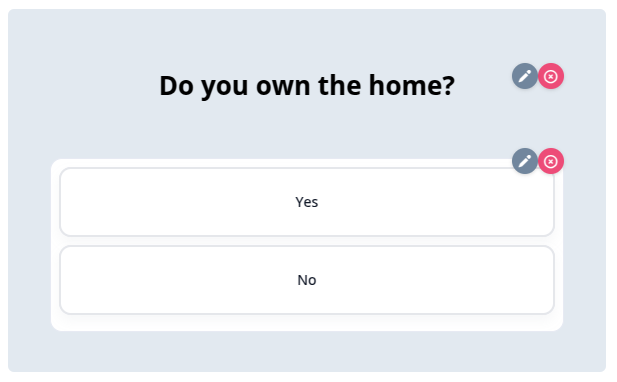
Pingtree’s data transformer refers to a mechanism or process used to manipulate or transform data between different formats, structures, or systems. Specifically, in field mapping for lead generation, a data transformer may be employed to ensure that data collected from lead forms or other sources is transformed and mapped accurately to the desired fields in a database, CRM system, or other destination. Ex: In certain verticals, buyers may only accept values that are formatted in a particular way, and are generally case-sensitive. For example, if you’re running a home services campaign, and one of your form questions is “Do you own the home” and the two values being passed on the backend are “yes” and “no”, by default, when you configure your lead mapping for that buyer in distribution, one of those two valuesare going to be what is passed in the field you’ve mapped from Pingtree to the buyer’s system. If this buyer ONLY allows ingestion of the values “Own” or “Rent” for this particular field, and you have sent that buyer “yes” or “no”, it will result in their API not properly collecting these values which can ultimately lead to the rejection of the lead, if the buyer requires this field. If you only had a single buyer, you could simply modify the value from your form itself. If you have multiple buyers, all of whom require values in a different format, that is where the issue would be. This is where Pingtree’s data transformer comes into play.
Applying the Data Transformer
The data transformer tool will be applied within a given endpoint, in the lead routing section.\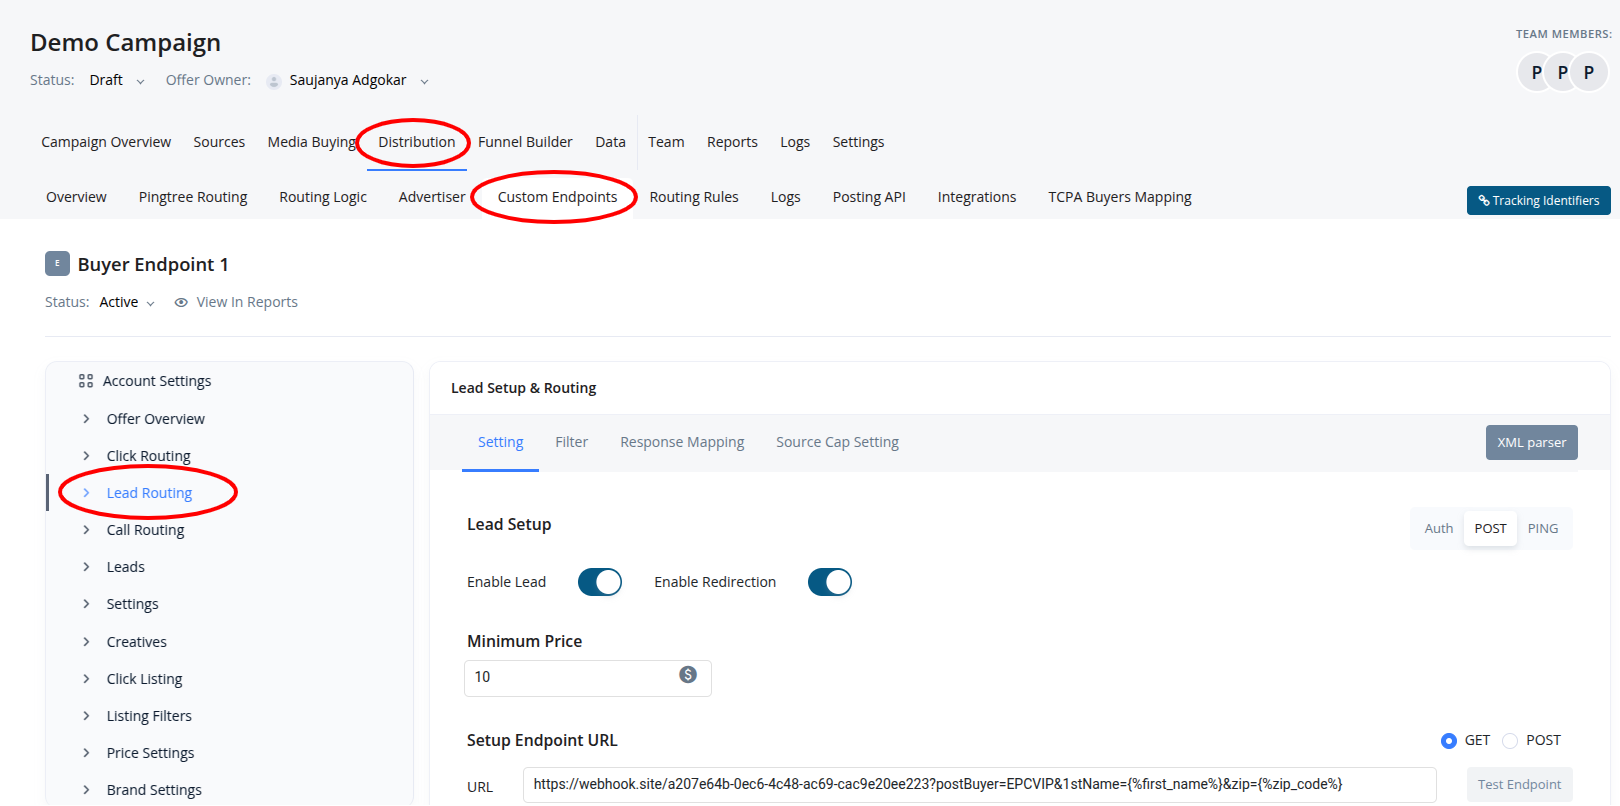
If you ever need to change these values, simply click on the + icon, and all of the values you’ve transformed for this field will collapse like in the image above.
Data Transformer > Date Formatting
While the overall concept is the same, in that some buyers may require their date-related values ingested in a specific format, there are some unique components to modifying a date field with the transformer tool in Pingtree. There are a few things to note first about the initial format of any date-related field. Inside of the form builder in any field you’re collecting a date, you will need to apply one of Pingtree’s pre-set date masking formats. If this masking is not applied, it can impact the functionality of the transformer tool. As you’ll see in the image below, there are 3 different formats you’re able to apply to your date field. DD-MM-YYYYMM/DD/YYYY
YYYY-MM-DD
Once you have mapped the Pingtree field to the buyer’s field (“date_of_birth” mapped to “DOB”) you will need to select the + icon which will open up the transformer tool. In the dropdown menu, instead of selecting String or Number as the option, you will need to select Date. Once selected, it will populate an additional dropdown menu directly underneath. As seen in the image below, these are the various transformer formats you’re able to manipulate the values into. For the following formats:
- ISO 8601
- Short Date
- Unix Timestamp
- Custom Format
| Transformed Value Result | Date Format in Enter Custom Value |
|---|---|
| 2021 | YYYY |
| 202108 | YYYYMM |
| 2021-08 | YYYY-MM |
| 8/5 | M/D |
| 08/05 | MM/DD |
| 20210805 | YYYYMMDD |
| 2021-08-05 | YYYY-MM-DD |
| 2021_08_05 | YYYY_MM_DD |
| 2021.08.05 | YYYY.MM.DD |
| 8/5/21 | M/D/YY |
| 08/05/21 | MM/DD/YY |
| 08/05/2021 | MM/DD/YYYY |
| 05 Aug 21 | DD MMM YY |
| 05 Aug 2021 | DD MMM YYYY |
| 2021 | YYYY |
| 202108 | YYYYMM |
| 2021-08 | YYYY-MM |
| 8/5 | M/D |
| 08/05 | MM/DD |
| 05 August 2021 | DD MMMM YYYY |
| Aug 5, 21 | MMM D, YY |
| Aug 5, 2021 | MMM D, YYYY |
| Aug 05, 2021 | MMM DD, YYYY |
| August 5, 2021 | MMMM D, YYYY |
| August 05, 2021 | MMMM DD, YYYY |
| 202108051315 | YYYYMMDDHHmm |
| 20210805_1315 | YYYYMMDD_HHmm |
| 2021.08.05.1315 | YYYY.MM.DD.HHmm |
| 2021-08-05-1315 | YYYY-MM-DD-HHmm |
| 2021-08-05_1315 | YYYY-MM-DD_HHmm |
| 2021.08.05.13.15 | YYYY.MM.DD.HH.mm |
| 2021-08-05-13-15 | YYYY-MM-DD-HH-mm |
| 2021-08-05 13:15 | YYYY-MM-DD HH:mm |
| 2021-08-05 1:15 PM | YYYY-MM-DD h:mm A |
| 2021-08-05 01:15 PM | YYYY-MM-DD hh:mm A |
| 2021-08-05 @ 1:15 PM | YYYY-MM-DD @ h:mm A |
| 20210805131504 | YYYYMMDDHHmmss |
| 2021.08.05.131504 | YYYY.MM.DD.HHmmss |
| 2021-08-05-131504 | YYYY-MM-DD-HHmmss |
| 2021-08-05_131504 | YYYY-MM-DD_HHmmss |
| 2021-08-05_1315.04 | YYYY-MM-DD_HHmm.ss |
| 2021.08.05.13.15.04 | YYYY.MM.DD.HH.mm.ss |
| 2021-08-05-13-15-04 | YYYY-MM-DD-HH-mm-ss |
| 2021-08-05 13:15:04 | YYYY-MM-DD HH:mm:ss |
| 2021-08-05 13:15.04 | YYYY-MM-DD HH:mm.ss |
| 2021-08-05 1:15:04 PM | YYYY-MM-DD h:mm:ss A |
| 2021-08-05 01:15:04 PM | YYYY-MM-DD hh:mm:ss A |
| 2021-08-05 @ 1:15:04 PM | YYYY-MM-DD @ h:mm:ss A |
| We Aug 5 21 | dd MMM D YY |
| Wed Aug 5 21 | ddd MMM D YY |
| Wed Aug 5 2021 | ddd MMM D YYYY |
| Wed Aug 05 2021 | ddd MMM DD YYYY |
| Wednesday, Aug 5 2021 | dddd, MMM D YYYY |
| Wednesday, August 5, 2021 | dddd, MMMM D, YYYY |
| Wednesday, August 05, 2021 | dddd, MMMM DD, YYYY |
| 1:15 PM | h:mm A |
| 01:15 PM | hh:mm A |
| @ 1:15 PM | @ h:mm A |
| Wed Aug 5 21 1:15 PM | ddd MMM D YY h:mm A |
| Wed Aug 5 2021 1:15 PM | ddd MMM D YYYY h:mm A |
| Wed Aug 05 2021 1:15 PM | ddd MMM DD YYYY h:mm A |
| Wednesday, Aug 5 2021 1:15 PM | dddd, MMM D YYYY h:mm A |
| Wednesday, August 5, 2021 1:15 PM | dddd, MMMM D, YYYY h:mm A |
| Wednesday, August 05, 2021 1:15 PM | dddd, MMMM DD, YYYY h:mm A |
| Wed Aug 5 21 01:15 PM | ddd MMM D YY hh:mm A |
| Wed Aug 5 2021 01:15 PM | ddd MMM D YYYY hh:mm A |
| Wed Aug 05 2021 01:15 PM | ddd MMM DD YYYY hh:mm A |
| Wednesday, Aug 5 2021 01:15 PM | dddd, MMM D YYYY hh:mm A |
| Wednesday, August 5, 2021 01:15 PM | dddd, MMMM D, YYYY hh:mm A |
| Wednesday, August 05, 2021 01:15 PM | dddd, MMMM DD, YYYY hh:mm A |
| Wed Aug 5 21 @ 1:15 PM | ddd MMM D YY @ h:mm A |
| Wed Aug 5 2021 @ 1:15 PM | ddd MMM D YYYY @ h:mm A |
| Wed Aug 05 2021 @ 1:15 PM | ddd MMM DD YYYY @ h:mm A |
| Wednesday, Aug 5 2021 @ 1:15 PM | dddd, MMM D YYYY @ h:mm A |
String Sanitizer
The String Sanitizer transformer tool allows users to modify the value which may contain certain characters on the initial ingestion of data.Objects & Arrays
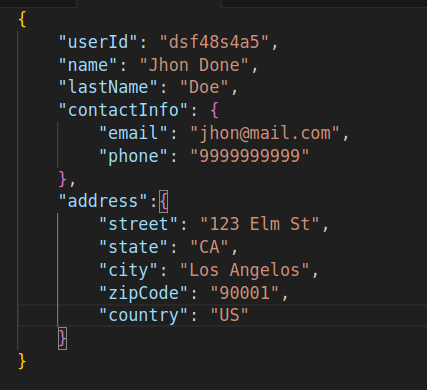
Single Object This is the most common format of data ingestion you will find. This is a collection of key value pairs where the key is a unique string and has a single layer of depth and flat structure. This is mapped normally - parameter to parameter In the following example, you would map Pingtree’s field to the field below like: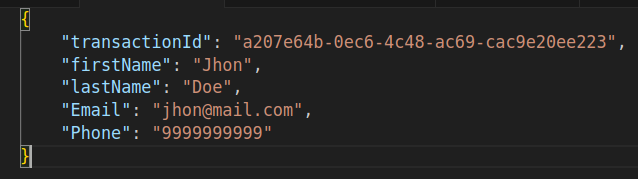
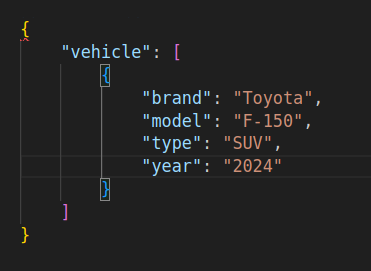
Pingtree has a standard mapping structure for data that needs to be posted into an array. The index is first, followed by a period, followed by the sequence of the object (0,1,2,3…), followed by a period and finally the parameter. In the following example, you would need to add the period in between the primary object and the nested objects, but since this is an array, you will also need to include a “0”. It would look like the following. If there were another object separated by the curly brackets, but within the same flat bracket, you would map the integer as a 1. The integer values you insert would continue to increase by 1 for as many objects that you are trying to map.\