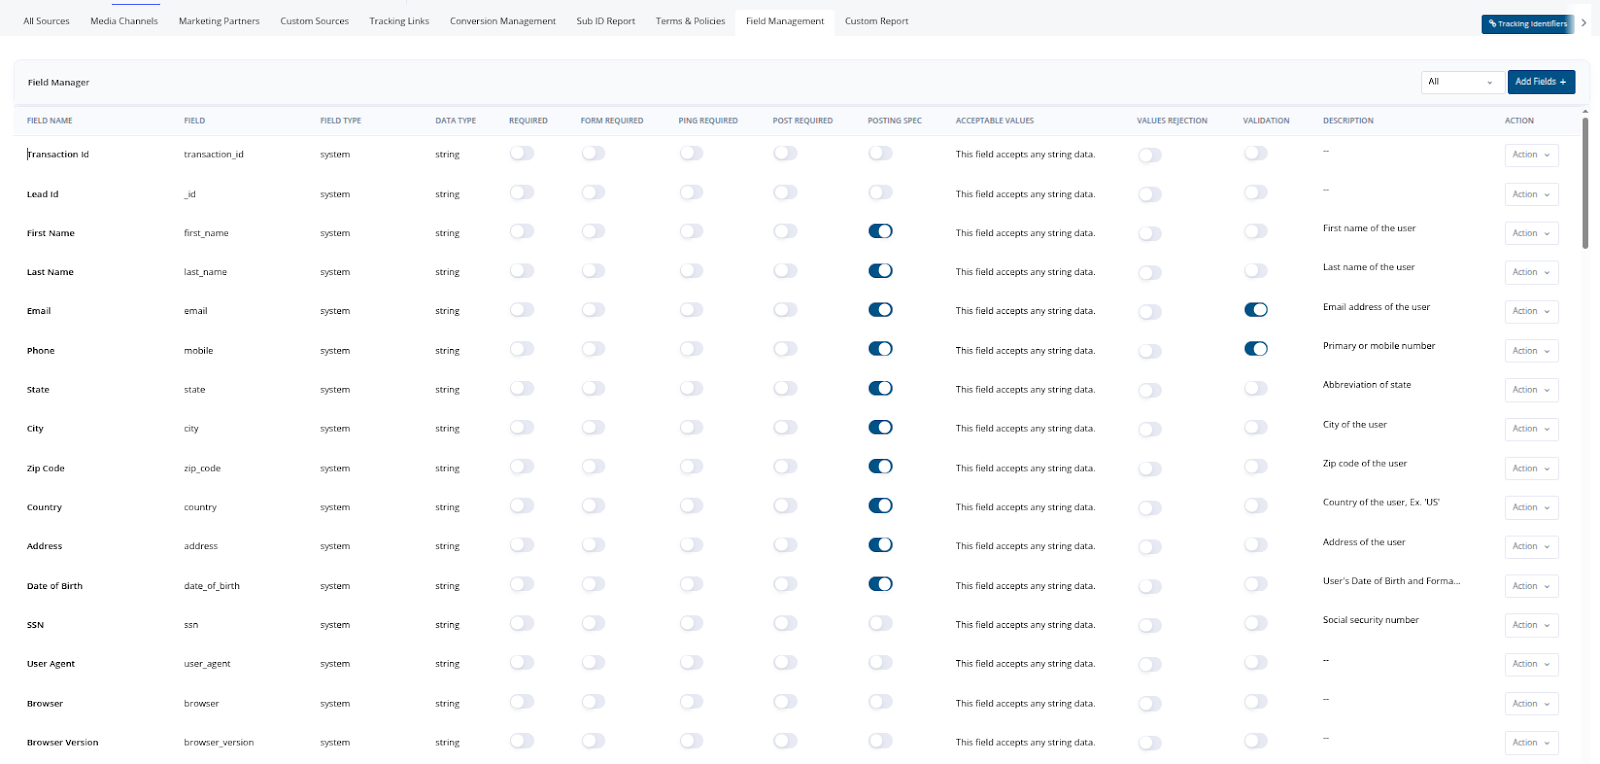
Accessible from the top navigation bar, this tool manages system-wide fields liketransaction_id,lead_id,first_name,phone, and many more.
Getting Started with Field Management
Step 1: Understand What Fields Are
Each field (like Email, Phone, or Zip Code) is a data point collected from your leads. You decide which fields are important and where they are required.Step 2: Turn Fields On or Off
- Toggle ON — Field is enabled and usable.
- Toggle OFF — Field is not used in your campaign/API.
Step 3: Choose Where It’s Required
Choose field requirements at each stage of the lead flow:
Enable any combination based on your workflow.
Step 4: Show Field in Posting Specs
- Posting Spec Switch → Enables field visibility in the source-facing API documentation.
- Helps partners understand what fields they must pass for each API type.
Step 5: Set Validation Rules (Optional)
- Acceptable Values – Define allowed values (e.g., only
"yes"or"no"). - Rejection Rules – Automatically reject leads that don’t meet defined criteria.
Step 6: Add Helpful Descriptions
Add a description to each field (e.g., “User’s primary phone number”) to help traffic sources understand what data to provide.Step 7: Apply Changes Globally (Optional)
Use the Apply to All Sources option to apply your settings across every source instantly — avoiding repetitive setup.Field Manager – Add Fields Guide

System Fields
- Core fields like
email,phone,first_name, etc. - Common across all campaigns.
- Automatically reusable.
Vertical Fields
- Based on the campaign’s selected vertical (Debt Relief, Tax, Legal, etc.).
- Only shows fields relevant to that vertical.
Custom Fields
- Manually created for your campaign.
- Useful for extra data points not covered by system/vertical fields (e.g.,
custom_code).
Other Vertical Sections
- Add fields from other categories, even if not your primary vertical.
- Expand and “Add Fields +” as needed.
Don’t forget to Save Fields after changes.
Field Enablement – System-Wide Impact
1. Lead/Click/Call Routing
Path:distribution → advertiser/customEndpoint → leadRouting / clickRouting / callRouting
- Enabled fields appear in the Lead Fields section.
- Shows label, parameter name, and input box for value.
- Fields can be mapped manually or left empty.
- New fields added appear at the bottom of the list.
2. Reporting Table Column Selector
- Enabled fields appear in the “Table Columns” modal.
- New fields default to toggle OFF.
- Toggle ON to make field a visible column in reports.
- Supports draggable ordering.
- Populates table rows if lead data exists for the field.
Key Benefits of Field Management
Cleaner Data – Enforce formatting, validations, and requirements.Faster Integrations – Clearly documented requirements for partners.
Better Control – Customize requirements per step and per campaign.
Clear API Specs – Accurate, auto-generated docs.
Time Savings – Apply globally across all sources.
Consistent Quality – Reduce junk data and increase conversion rates.
Smart Filtering – Only show fields relevant to selected verticals.
Organized UI – Find and add fields quickly by type.
Flexible Expansion – Add fields from other verticals when needed.
Form Precision – Keep lead forms clean by including only what’s needed.
Per-Campaign Customization – Tailor field setup uniquely for each campaign.